
Tyre setup
The four little patches of rubber, with a combined area roughly the size of the palm of your hand, are all that keep you from landing up in the emergency ward as you go whizzing around the corners on the track at insane speeds. What’s the moral of this - keep the tyres in the best condition possible. So, here are a few things you should be looking out for, and also how to fix some problems should they happen to you.
Storage of new tyres
This probably doesn’t apply to most competitors as they purchase new tyres on as as-and-when basis, or at Nationals when they are obligated to do so. Notwithstanding this, all tyres keep their performance best if they are stored away from light (in a tyre bag or black plastic refuse sack) at low humidity and at normal ambient temperature ~20°C. Whilst in storage keep them away from direct sunlight, fluorescent lights, high temperatures and electric motors, as ozone gases also affect the rubber. Be careful not to spill fuel or other hazardous liquids onto your tyres. Do not store them below 0°C and remove the plastic protection film from the tyres just before fitting to the rims.
Barcoding on tyres
The barcode of karting tyres generally begins with the number 8 which has been accredited from CIK and the remaining 7 digits are given in a random order. The barcode is mainly meant to be used as a control instrument at race meetings, thus ensuring that competitors are only using those tyres which are dedicated to them during the event. Also remember that swapping of tyres between karts and/or competitors during race meetings is not allowed.
‘Scrubbing in’ new tyres
After fitting new tyres, the general advice is to go out and do a few laps to gradually bring them up to temperature. Once the tyres ‘come on’, do another couple of laps then pit and allow the tyres to cool completely (some sources even suggest using wet rags to cool them down totally). This procedure is supposed to stabilise the compound and help the tyre to remain consistent thereafter. Opinions are divided on whether this works or not, but most agree that it can’t hurt to go through this procedure. One thing is for certain though, brand new tyres offer more grip than used tyres, and the more heat cycles a tyre has gone through, the less grip it offers. Always check wheel alignment before using your kart and re-check alignment if you have been involved in an incident or hit a kerb heavily on the track. Always check your preferred tyre pressure before and after you take to the track. After use and when storing your tyres, remove excess air to retain the elasticity of the tyres as this will prolong life. Note that deflation of the tyres is not allowed to be done whilst the kart is in parc fermé.
Tyre softeners
The use of tyre softeners can alter the compound of the tyre which can result in a failure of the tyre i.e. it’s a safety risk. Also, most tyre softeners are toxic and can cause cancer. Apart from that, they probably only provide a real advantage in wet conditions, as one often suffers from too much grip in the dry anyway.
Initial settings
If you have absolutely no idea of where to start with the kart settings and tyre pressures, then the table below may prove useful as a starting point.

Tyre temperature gauge (pyrometer)
These are available but can be quite expensive. The best types have a needle-like probe that can measure temperature under the outer layer of rubber. The cheaper versions use a non-contact sensor to read the tyre surface temperature. Even a cheap tyre pyrometer is an excellent tool as it allows you to check a lot more than the temperature of each tyre. By taking a reading in three places across the width of the tyre, you can determine over- or under-inflation and adjust pressures accordingly. These readings will also help you figure out if you have too much or too little camber.
Cone wear
Cone wear is a situation where the tyres on a kart show a wear pattern that is more on their inner edge than the outer. It’s worth investigating because the tyres are providing you a clear indication of a chassis set-up problem. In extreme cases, the outside edge of the tyre may look like it hasn’t touched the track at all, whilst the inner is being badly worn away i.e. the tyre is literally wearing into a cone shape. On rear tyres, it indicates that there isn’t enough weight transfer to the outside wheel during cornering.

Cures include stiffening up the rear end with additional seat-stays, or narrowing the rear track to provide more weight transfer and hence more bite at the rear. On the front tyres, it generally shows a chassis that is set up with too much camber or too little caster. There may be some understeer present, so there are two settings that can be altered, but only one at a time. Widening the front track will provide more front grip and can cure the problem. Increasing positive camber will result in more front weight transfer and provide the same effect. It does however have a drawback in that steering into the corner will require more effort, but release will be quicker.
Getting the kart settings close to correct will quickly remove the visual signs of cone wear, but even if you can’t detect it any more, that doesn’t mean that it has been eliminated completely i.e. a tyre may still be over-worked on one edge, but not so much that it is immediately apparent. Remember that if a tyre exhibits the early signs of cone wear, change the settings immediately to get rid of the cause, because if you leave it for too long and eat too much of the inner edge away, you’ll irreversibly change the tyre profile and suffer loss in performance.
Rear tyre adjustments
Start by adjusting pressure on the rear tyres. Then take temperature readings across the tyre as soon as the kart is back in the pits. Don’t worry about how high or low the actual temperatures are to start with, because it is the variance you are interested in. The temperature readings used in the following sections are in ºC, and are more to illustrate the temperature trends across the tyre, rather than an actual temperature to aim for. Most kart tyre manufacturers say that the tyre’s optimum temperature range lies between 75ºC and 85ºC. Almost any kart tyre will self-destruct if its operating temp exceeds 95ºC. A kart tyre getting close to the upper edge of its optimum temperature range will start to show a shiny wet look when on the track.
For under- or over-inflation, the temperature readings across the tyres would be as follows.
Outside / Middle / Inside
80 70 80 = Under-inflated (the middle isn’t doing enough work)
70 80 70 = Over-inflated (the middle is in contact with the track most)
80 80 80 = Just right (even loading across the face of the tyre)
Remember that cone wear is visible, but only to a point, so here is how the temperature reading can help you get closer to the optimum.
Outside / Middle / Inside
70 80 90 = A weight transfer issue but maybe insufficient to show on the tyre tread
90 80 70 = Too much weight transfer and kart may be starting to hop in the corners.
Front tyre adjustments
Because the front end is more adjustable than the rear, you have two things to consider viz. the camber/caster settings and the pressure. Also bear in mind the earlier comment that the kart may be understeering. Unless you get lucky on the first adjustment, you will probably have to do the front end adjustment a few times, first to sort out the camber and/or caster, and secondly to modify the pressures.
Unfortunately, raising or lowering tyre pressure also has some bearing on the amount of camber required. If you get the tyre showing even temperatures outside and inside, raising or lowering the pressure to bring the middle into line you will also affect the way the tyre flexes when cornering. The softer the pressure, the more the tyre will flex while cornering and the more negative camber you will require to counteract this, and vice versa.
Outside / Middle / Inside
70 80 90 = Too much negative camber (inner edge working too hard)
90 80 70 = Too much positive camber (outer edge working too hard)
80 90 80 = Camber OK, but tyre over-inflated
90 80 90 = Camber OK, but tyre under-inflated
You will soon get familiar with how much camber adjustment is needed to correct the temperature variance, and also what the temperatures are telling you about the tyre pressure.
Blistering
The picture on the near right shows a rear tyre that has blistered on its inner edge. Blistering is caused by a tyre that has been over-worked and the temperature has increased to the point where the rubber starts to melt in small or large patches i.e. it ‘bubbles’.
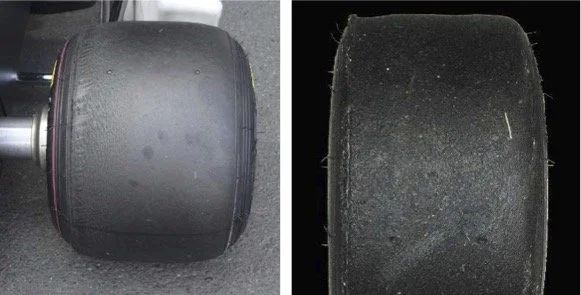
This is usually only along one of the edges, but in rare cases it can be seen across the entire width of the tyre (refer picture on far right).
Setup checklist
Summing up, it’s actually very easy to interpret one’s tyres provided that you remember that friction between the track and tyre generates heat and that by measuring this, you can determine which part of the tyre is working hardest and adjust to compensate.
Here’s a quick checklist to follow assuming you have a pyrometer.
Do a session on the track, then use the pyrometer on the hot tyres and record the results.
On the front. Using the temperatures you have measured, adjust the camber of the kart - more negative camber for a hot outer, less for a hot inner. Alternatively, you could increase the positive caster, particularly if there understeer.
On the rear. Raise or lower the rear tyre pressures to even the temperature across the tread - down for a hot middle, up if the middle is cooler. If there are three radically different temperatures, then a hot inner edge demands a little more weight transfer, and a hot outer edge a little less.
Do another session and measure the temperatures again.
Now, the rears should be almost spot-on but the fronts might need a pressure adjustment to correct a too-hot or too-cold middle. An almost consistent reading across the tread of each tyre tells you that you have the correct camber setting on the front and optimum inflation pressure for all the tyres.
Use adjustments on the karts chassis set up to raise or lower the front and rear tyres overall temperature to give cool tyres more work to do, and hot tyres less. Remember that increasing the ride height (either front or rear), the more weight transfer there will be, and the more the tyres at that end of the kart will need to work. Don’t worry about discrepancy between left and right sides of the kart as all tracks will work one side of the kart harder than the other. It is the difference between front and rear you need to concentrate on, as they need to be roughly the same. Note that a big discrepancy in the temperatures of the front and rear tyres left to right can indicate a bent chassis which is forcing one tyre unduly hard into the track surface.
Continue to experiment with the chassis set up until the tyre temperatures are within their optimum range.
Record all readings i.e. chassis settings, tyre temperatures, air temperature and track temperature (tip - use the pyrometer on the track surface).
Once you are proficient with getting these baseline settings, you can start to bring them ‘on’ either earlier or later in a race.
Emile McGregor - MSA Technical Consultant