
The KARTING spark plug
The spark plug - you don’t give it a second thought when things are going well, but probably curse it all the way to the rubbish bin when it fails!! Catastrophic failures aside, a common misconception is that changing the spark plug will improve the power output considerably but that’s not the case as only a small increase of 1 or 2% is actually realized if one has the correct plug choice with the proper gap setting to start with. In the karting game however, you don’t have much say in what spark plug you can use as the rules generally restrict this to a choice of one or two (three in the case of the Bambino’s).
anatomy of a SPARK plug
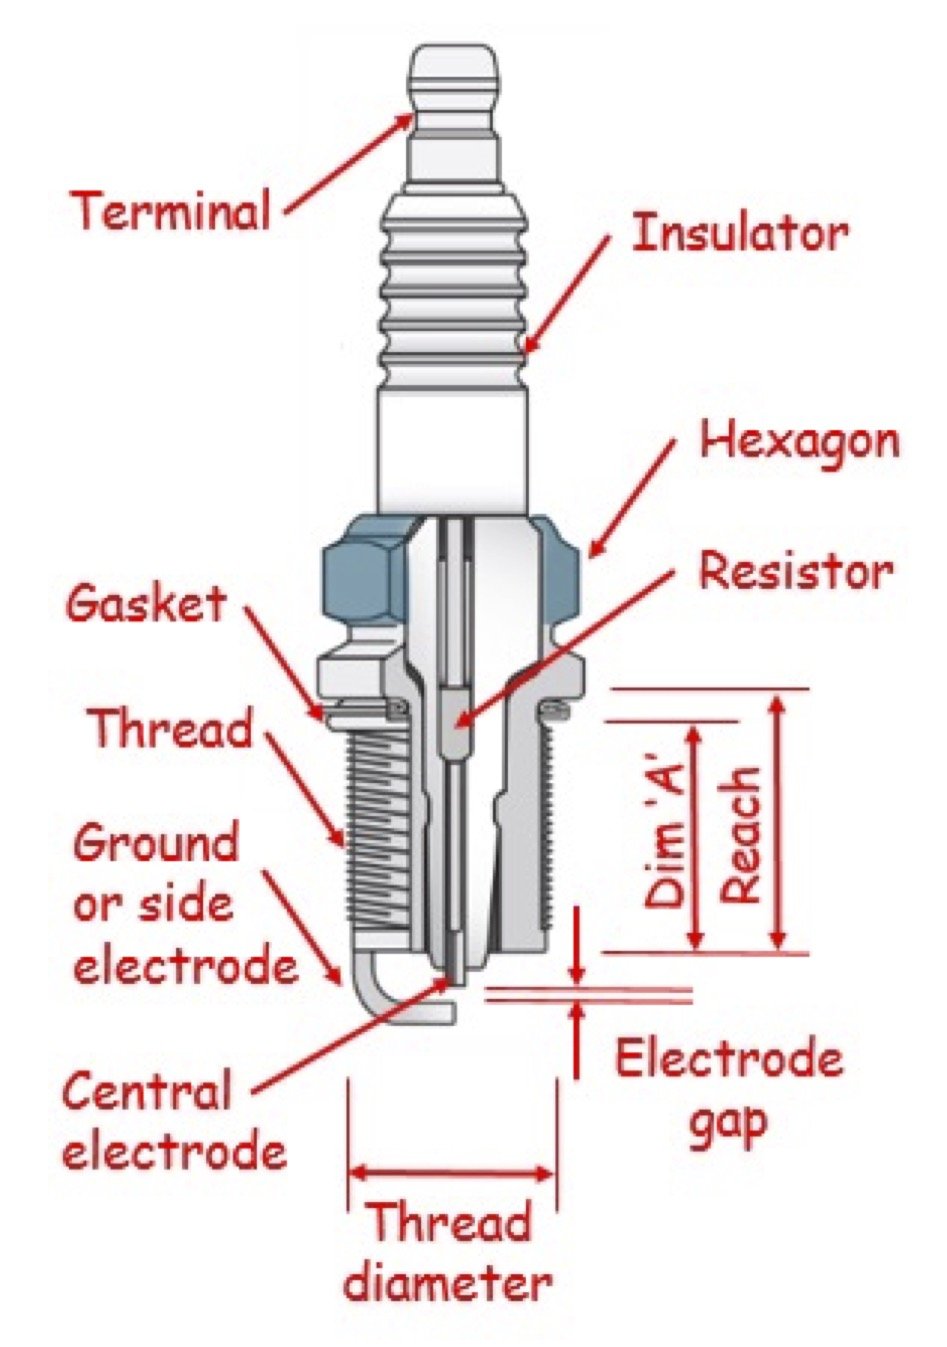
The major components of a typical spark plug are shown in the diagram on the RHS.
The high voltage generated by the ignition system is fed to the terminal at the top of the spark plug and then proceeds down the central electrode. The small gap between the central and side electrodes (known as the electrode gap or spark plug gap) is then breached and the resulting spark initiates the combustion process of the compressed mixture within the cylinder of the engine. This central electrode was traditionally made of copper as it is an extremely good conductor of electricity, but for higher performance engines it has to a large extent been replaced with iridium after it was introduced by the manufacturers from about 2010 onwards. The major downside to a copper electrode was that it tended to deteriorate over time due to the high temperatures within the combustion chamber, and as a result the plugs had to be changed fairly often. Iridium however can withstand much higher temperatures and it thus lasts much longer – the drawback of course is that the spark plug ends up being more expensive to replace.
Because iridium is a rare metal in short supply, the manufacturers don’t always replace the whole of the central electrode with iridium, but rather end up laser welding a small spot of it to the end of a copper electrode. Instead of an iridium central electrode, some manufacturers also make use of a thin wire platinum or nickel as the electrode because this works perfectly well and also lasts longer than copper.
HEAT RANGE

As mentioned, the spark plug is used to ignite the air/fuel mixture within the cylinder, but it does however have another major function and that is to remove heat from the combustion chamber.
At the same time, the tip of the plug needs to remain at an optimal temperature of between 500°C to 800°C to prevent what is known as ‘fouling’ or ‘overheating’. Anywhere within this temperature range and the tip of the plug remains in what is known as the ‘self-cleaning’ range.
The operating temperature of the tip is determined by the length of the path between the firing tip of the insulator and the point where the insulator meets the outer metal shell of the spark plug. Essentially this is goverened by the length of the ‘nose’ of the plug as shown in the diagram with a longer nose resulting in a ‘hot’ plug (the nose end stays at a higher temperature) and a shorter nose in a ‘cold’ plug (colder nose temperature).
To indicate the heat range of the plug, the manufacturers use a numbering system, but beware of what you see because not only does the number system span a different range, but they are often opposite to each other. For Champion and Bosch, the higher the number, the hotter the plug. For NGK and Denso, the higher the number, the colder the plug and as a rule of thumb for the NGK range, there is a 75°C to 100°C difference in tip temperatures between the numbers.
PLUG PROBLEMS
Removing the plug from the engine immediately after a session on the track can also provide you with a good indication of the mixture setting. The two most common causes of spark plug problems are carbon fouling or overheating. Fouling is usually because of a rich mixture and the nose of the plug runs below its self-cleaning temperature of ~500°C. When the plug is removed, the nose area is usually damp and also shows up as a very dark colour tending towards black. An overheated plug is probably running in excess of ~800°C and is usually the result of a lean mixture that in turn can lead to pre-ignition and damage the engine. It is evidenced by an insulator that may be blistered, is dry, and also has a colour that is tending towards white. When the mixture setting is good, the colour of the insulator is usually a light straw colour that can also tend towards brown.
PLUG GAPPING
The electrical spark always follows the path of least resistance, and because the plug gap is typically the closest point from the centre electrode to the ground electrode, the spark will jump this gap. The voltage requirement is directly proportional to the gap size and the larger the gap, the higher the voltage required to jump the gap. The optimum gap is determined by a number of factors inter-alia, the engine design and performance, the ignition system voltage, the mixture composition (rich or lean), etc. Increasing the gap size increases the spark length exposed to the air/fuel mixture which in turn maximizes the burn efficiency. However, if the gap is too large and the ignition system can’t provide the voltage needed to spark across the gap, or turbulence in the combustion chamber blows out the spark, then misfires will occur. With that said, the one over-riding factor to take into account is that the karting rules dictate the maximum gap allowed for the class in which you are competing, and failure to be compliant is regarded as a technical infringement with a consequent non protestable disqualification.
When you buy the plug it will have a certain gap that is set during the manufacturing process, but it’s probably not the gap you’d like to run with. When gapping an iridium or thin platinum wire central electrode plug, you need to be careful as they have a delicate central electrode that can easily be damaged if one doesn’t pay a fair bit of attention, and when doing so, you should never exert any major force on the centre electrode or its ceramic insulator.

Many different types of tools can be used for setting the gap to the desired value and they range from key-ring styled wires, to a disc of varying thicknesses, and also bladed feeler gauges.
You shouldn’t adjust the ground electrode more than half a dozen times (preferably less) because although it’s durable, it’s not meant to deal with lots of pressure and might snap off. Any damage to either electrode means you’ll need a new spark plug.
Once having determined the actual gap and its found to be too small for your liking, then the side electrode needs to be adjusted to increase the gap, and its best to use a tool such as the one shown for opening the gap.
If the gap is too large for your liking, then gently tapping the side electrode against a smooth hard solid surface as shown will close the gap. Alternatively, you could invest in a special jig (refer picture on the left) where the side electrode can be adjusted closer to the central one via a thumbscrew at the one end of the jig.
USING A FEELER GAUGE
By far the most popular instrument used here in South Africa for setting the gap on a spark plug, is a set of feeler gauges. Be careful when purchasing a set of feeler gauges as cheap ones from the ‘corner café’ won’t necessarily be very accurate. Blade length is also important as they range from in excess of 100mm right down to around 35mm, and these shorter ones are also usually ‘inch’ versions. As an example, one of the blades could be marked 0,017” which is the equivalent of 0,432mm. Its best to get a decent set that are fully metric and with these, the blade thicknesses usually increase in increments of 0,05mm with the thickest blade being 1,00mm.
It’s always best to use a single blade for setting purposes wherever possible, but if you require to use more than one blade to achieve a certain size, then use two blades that are located close to each other within the pack. As an example, using the 0,50mm + 0,60mm blades to get 1,10mm is a better choice than 1,00mm + 0,10mm because you could get an unwanted ‘extra’ gap from the blades being too far apart from each other within the pack. Getting the correct ‘feel’ of a gap, can be likened to a ‘Goldilocks moment’ – one is too loose, one too tight, and one is just right. If you are operating close to the limit that the rules allow, then be very precise when making this setting and rather err on the tighter side to be safe when the gap is re-checked by the Scrutineers.
READING THE NUMBERS
Reading the letters and numbers on the ceramic insulator of the plug or in the area of the hexagon can provide one with a lot of information such as thread size, thread pitch, thread reach, hexagon size, if it has a built-in resistor (reduces the electrical noise), type of electrode, etc. but most importantly its heat range. Bearing in mind that one is limited to what the rules lay down for your class, let’s look at what can be used in the various the classes.
Bambino class. Here one has the choice of 3 plugs viz. Champion RCJ7Y, Bosch WS5F, or NGK BPMR7A. All of them have the same 14mm x 1,25mm thread, a very short 9,5mm reach, a 19mm hexagon, and are more or less equivalent to each other when comparing their heat ratings. There is no specification on the spark plug gap and you are free to use whatever works best for you.
All Rotax classes. Only two choices are available for use viz. NGK GR8DI or NGK GR9DI. Both plugs have a 14mm x 1,25mm thread, a 19mm reach, a 21mm hexagon and a built in 5 kiloOhm resistor. Both are what NGK term mid-heat range with the ‘8’ running a warmer nose temperature than the ‘9’. Currently, the maximum allowable gaps are as below with the manufacturer’s recommended gap being 0.9mm for both heat ranges:
· Micro Max, Mini Max 1,2mm
· Jnr Max, Snr Max, DD2 1,0mm
Kid Rok & OKJ classes. Only two choices are available for use viz. NGK B9EG or NGK B10EG. Both plugs have a 14mm x 1,25mm thread, a 19mm reach, a 21mm hexagon, and both have a central fine wire nickel electrode fitted. Both are what NGK term mid-heat range with the ‘9’ running a warmer nose temperature than the ‘10’. There is no specification on the spark plug gap and you are free to use whatever works best for you. As a guide, the manufacturer’s recommended gap for either plug is 0.6mm.
Mini Rok class. Only one plug viz. NGK B10EG is allowed. Other details are as stated above.
KZ2 class. Apart from the fact that the spark plug used must be mass-produced and strictly original, there are no other restrictions on its make or the gap used.
PLUG AND HEAD MODIFCATIONS

Referring to the diagram on the RHS, one may be tempted to increase the reach of the plug by re-machining the face just above the gasket
This will have the same effect as increasing the compression ratio because the threaded portion sits lower into the combustion chamber and the head volume at TDC is reduced. A second approach might be to thin down the copper gasket to achieve a similar, but not quite so effective, result.
Similarly, machining down the face of the recess where the plug and gasket abut to the cylinder head could achieve a similar result.
A word of warning – the pointy heads at the CIK have thought about this and their rules (which are applied if there is nothing in our local rules) stipulate that dimension ‘A’ in the diagram must not be less than 18,5mm for a 19mm plug reach. Furthermore, there are gauges that the Scrutineers use to check if the cylinder head has been modified. Just don’t even think about going along that route as you are heading for a world of hurt.
Emile McGregor - MSA Technical Consultant