
Chains, sprockets & gear ratios
Power and torque
Before we start delving into this, we need to be aware of the 2nd law of motion attributed to Isaac Newton (he’s the dude depicted with the apple falling onto his head) which in simple terms, is that force equals mass times acceleration. For a given vehicle the mass is pretty much fixed, so the more force you have, the bigger the acceleration. When buying a car, most petrol-heads appear to be more obsessed with raw engine power rather than the torque the engine is capable of producing, so let’s analyse this for a moment. Being a bit of a petrol-head because you’re into karting, you should already be aware that the top speed of a vehicle is determined by a number of factors amongst which are the frontal area, the drag coefficient, the rolling resistance, and the engine power. Well, as you can’t do too much to change the majority of these, the only thing really under your control is the engine power. On the other hand, the force i.e. the torque at the rear wheels (read on for an explanation later), is responsible for the acceleration of the vehicle. The more the available torque at the rear wheels, the greater the acceleration.
So, back to the original statement – why the obsession with power? Well, one would suspect it may have a lot to do with bragging rights. Personally, I’d go for oodles of torque any day of the week because you really can’t use all the power to get to the high 200’s or beyond unless you are on a race track where Johnny Law has no jurisdiction. On the other hand, there is no legislation that says you need to limit how fast you can accelerate to 120kph (or thereabouts!!). This all goes to pot when you look at the lowly two-stroke kart, because here you want as much as you can get from both the power and the torque for both maximum top speed and maximum acceleration. Johnny is however still lurking in the wings in the form of the technical regulations – you can’t alter the engine power output because the engine is laid down for the class and must be raced as supplied, apart from items such as the squish (there’s a minimum allowable limit), main jet sizing (normally a free choice), and a few other items. You are however allowed to alter the torque at the rear wheels by changing the gearing. Depending on the class this is usually free, or for the more junior classes it might be limited within certain parameters or also the track being raced at.
Number of teeth on the sprockets
The torque generated by the engine is transmitted via the crankshaft onto the front sprocket located on the clutch drum. In layman’s terms, torque is nothing more than a force multiplied by a lever arm length, which in our case is the radius of a gear, or tyre, etc. If the force acting on the front sprocket teeth is Ffs, then we have:
Ffs = Tcs ÷ Rfs
where Tcs is the torque at the crankshaft, and Rfs is the radius of the front sprocket.
Now, this force Ffs is transmitted along the chain to the rear sprocket. So, the torque at the rear sprocket is given by:
Trs = Ffs x Rrs (1)
where Rrs is the radius of the rear sprocket.
The torque acting on the rear axle, and consequently the rear tyres, is identical to this. Hence, the force acting horizontally at the circumference of the rear tyre at road level, and which is available to accelerate the kart is given by:
Frt = Ffs x (Rrs ÷ Rrt) (2)
where Rrt is the radius of rear tyres.
Re-arranging equation (1) to give us the value of Ffs and then substituting that into equation (2) gives us:
Frt = (Tcs ÷ Rfs) x (Rrs ÷ Rrt)
Analysing this relationship, we can see that the greater the radius of the front sprocket (i.e. the number of teeth), then the lower the value of the force moving the kart. The conclusion is that if we increase the number of teeth of the front sprocket we will have lower acceleration of the kart, but we will be able to use the engine torque for a greater range of speed, and we will have the opposite result with less teeth. Alternatively, with a greater number of teeth on the rear sprocket we will have more acceleration of the kart for a smaller range of speed, and vice-versa for a smaller number of teeth.
Increasing the number of teeth on the rear sprocket means a larger diameter. Therefore to maintain a required gear ratio, it isn’t a bad idea to reduce the number of teeth on the front sprocket when the diameter of the rear sprocket is getting large. As a hypothetical example, a sprocket and pinion combination of 90T and 10T provides an identical gear ratio of 9:1 as does a 81T paired with 9T, but the latter’s sprocket is much smaller in overall diameter. This avoids the chain and rear sprocket hitting any of the kerbs when cutting through a corner or going over a localized hump in the track.
Chain pitch
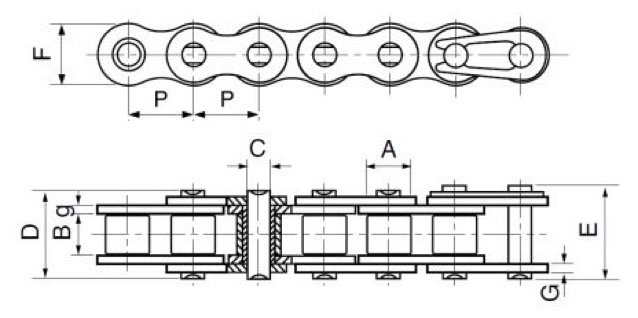
The pitch on a chain i.e. the distance between consecutive links and indicated by P in the sketch below, is either specified in millimetres or as a chain number.
Four-stroke karts tend to use a #35 chain with a pitch of approx. 9,5mm, whilst our two-stroke karts use a #219 chain which has a much smaller pitch of 7,774mm. The smaller pitch on the #219 chain results in a number of advantages as follows:
One can cram more teeth into the same overall diameter of the sprocket thus further reducing the risk of insufficient ground clearance.
It is roughly 13% lighter than the #35 chain and this reduces the overall mass of the rotating components thus contributing to better acceleration.
The smaller pitch results in reduced vibration because the chain conforms easier into a circular shape as it wraps and unwraps around the sprocket or pinion.
It contains more pins in a given length of chain which translates into a longer life for the chain, sprocket, and also the pinion.
Wear on the chain
Mechanical parts linked to each other and subjected to motion will wear over time and a chain is no exception. Most of the wear on a chain takes place on the pins plus the rollers or their bushes, and it visibly manifests itself in the elongation of the chain i.e. a change in the overall length. More than any of the other factors, wear on the pins is the one that most contributes to the reduction in the fatigue strength and eventual failure of the chain. Tests by the manufacturers have shown that if the elongation is limited to 1,5% or less, then fatigue failure is virtually eliminated. Because of a number of factors, a kart chain tends to wear a lot, so we can happily use an elongation of around 3% as a replacement guide because chain failure is in any event not usually due to fatigue.
It is possible to measure chain wear with a gauge such as those shown below, but they rely on being able to slip the ‘tang’ of the tool into the opening between adjacent rollers. This is fantastic for very large pitch chains, but the open space between the rollers on a #219chain is only about 3,2mm which is pretty small. Consequently, the tang on a gauge for this chain pitch would be easily bent if the gauge was not handled correctly, and furthermore, it is also doubtful if they are even available.

A far easier (and cheaper) method for checking wear is to measure the distance between rollers that are a fair distance apart using a digital Vernier. To do this, lay the chain on a flat surface with the rollers facing upwards, stretch the chain out, and then using the internal measuring jaws (see below) after zeroing the Vernier, open the jaws until the reading is roughly 104mm. Insert the jaws into the gap between the rollers and open them further until they butt firmly against the rollers. This will be equivalent to 14 pitches and the level of wear can be compared to the values in the table below. For your own good, replace the chain if the measured value is between the 75% and 100% wear dimensions shown.


CHAIN WEAR TABLE
Percentage wear table #219 chain
measured between rollers 14 pitches apart
(100% wear equates to 3% chain elongation)
Chain cleaning and lubrication
On the kart, apart from the chain guard which is there for safety reasons only, one is essentially using a chain that is open to the elements and the surrounds of the track which are usually dirt or grass. This allows the chain to collect a fair amount of dirt and debris, which is aided and abetted by the fact it is coated with a lubricant which invites the dirt to stick to it. Cleaning of the chain and sprockets is thus essential for an efficient transfer of power which is promoted when all items are new, or as good as new, and well lubricated.
Cleaning of the drive train components should be done at the start of every race day, or if the kart is subjected to any form of off-tack excursion. Once removed from the kart, the chain should be cleaned by thoroughly submerging it into your choice of cleaning liquid and using a stiff bristle paint brush to get into all the nooks and crannies. If it’s really dirty, a second dose in clean fluid would not go amiss. Then, remove all excess liquid with a clean cloth and lubricate either before or after fitment to the kart. Proper lubrication of the chain reduces the amount of wear but does not eliminate it, and hence constant lubrication is critical. A good spray with high quality chain lube whenever the kart comes off the track i.e. when the chain is slightly warm and the lube will penetrate better, is the way to go.
Chain tension
Once a chain is fitted, ensure that it is adjusted correctly with the proper amount of slack. If the chain is too tight it causes binding of the system and you end up wasting some power in overcoming this. On the other hand a chain that has too much slack can lead to occasional jumping over the teeth, or worse yet, the chain coming off entirely and so your race has just ended in disaster. The total amount of slack ‘A’ as shown in the diagram should be 4% of the centre to centre distance of the drive train.

Typically this slack is around 250mm on a kart which then translates into a total up and down movement of 10mm when pressure is applied to the chain with one’s finger.
Tooth wear
A worn pinion or sprocket is so often overlooked. Remember that the sprockets are made of aluminium to reduce their rotating mass, but unfortunately that material is fairly soft and will thus wear very easily. They are a bit expensive but if your wallet allows it, then rather err on the conservative side and replace the sprocket too early than too late – some of the more dedicated karters and teams replace both the sprocket and chain for each major meeting. Don’t be fooled into believing the old wives tale that a worn sprocket will give you an extra half tooth on the gear ratio, because it doesn’t.

One thing for sure is that combinations of worn sprockets and/or chains will definitely bind up the transmission system far more than when everything is new, and will also promote the chain from slipping off completely when you least want it to do so. Because of the smaller quantity of teeth and also the material it is made of, the pinion is far less susceptible to wear but should not be overlooked in the scheme of things. Nevertheless, inspect both the pinion and sprocket regularly, and as soon as the teeth start to look sharp or hooked, it should get thrown out along with the dirty rags.
Alignment of the chain
Not only is a chain weaker when subjected to side loading, but the resulting rubbing friction that has to be overcome means that power is lost in the transfer of the driving force to the rear wheels. With little enough power coming from the engine, you really don’t want to have that to worry about as well. Alignment of the drive train is thus of paramount importance and should be checked on a regular basis as the sprocket carrier (and therefore the sprocket itself) may also have moved marginally on the axle due to loose grub screws, a bump from another kart, etc. A useful tool for this is a chain aligner, which easily aligns the front pinion and rear sprocket. The cheapest and simplest of these is a straight edge as shown in the pictures below. Other variations on the same theme are a laser alignment tool that clamps onto the sprocket, or a mechanical version of this. Ultimately, they all do the job with much of a muchness in accuracy, so let your wallet decide the best choice for you.

Length of chain
Unlike most chains which have a master link plus circlip allowing the chain to be split and also to be shortened, this is not the case with a #219 chain. These chains are supplied in fixed lengths from 94 links up to 116 links in increments of 2 links e.g. 98, 100, 102, 104, etc. There are various calculators available enabling one to determine the chain length required for a given centre distance knowing the chain pitch and the number of teeth on the pinion and sprocket, but you won’t need to use that. Fortunately, all karts are made with a double rail on the RHS of the chassis that allows a fair amount of adjustment of the centre distance between the pinion and rear axle through moving the position of the engine. Every change in chain length downwards or upwards results in the engine being moved closer or further away from the rear axle in increments of roughly 7½mm. Altering the number of teeth on the sprocket by 1-tooth at a time changes the centre to centre distance by a much smaller amount of around 2mm, so if the engine mount was already against one of its end stops, you might also need to swap to a different chain length.
Gear ratios
Too large a sprocket on the back of the kart and you will probably be fast through the tighter parts of the track and in the slower corners, but once you hit the long straights you are going to be a sitting duck (it’s like driving in 4th gear when everyone else is in 6th). On the other hand if you have too small a rear sprocket you might be like a rocket at the end of the straight, but you’ll lose too much on the tighter corners and slower parts of the track to really benefit from the increased maximum speed.
We don’t get to experience this much, but going larger at the rear in wet conditions can help a lot. If you switch to rain tyres then adding 3 or more teeth would not be unreasonable. This is because the engine revs are not so high and adding teeth provides more pull out of the corner. As the track dries and the corner speeds increase, then running less teeth becomes more and more important. What ratio you run in the rain is always an educated guess, but the wetter the track the more teeth you add, and the drier the track the less teeth you add.
Post-race discussions on this subject usually start with a comment along the lines of ‘If only I had used a bigger (or smaller) sprocket ’. A gear ratio chart is included overleaf so that you can print that page on its own should you wish to consult it on a regular basis.
Some folks find it difficult to understand the numbers you see in the table (gear ratio), so let’s compare it to car. A car with a 5-speed gearbox, might have gear ratios as follows:
1st 4,21 : 1 (or simply 4,21)
2nd 2,49 : 1
3rd 1,66 : 1
4th 1,24 : 1
5th 1,00 : 1
The rate of acceleration in 1st gear is greater than 2nd gear, etc., but the top speed in 5th is higher than in 3rd gear and so on. The higher the number, the better the acceleration but top speed suffers. The lower the number, the better the top speed but acceleration suffers.
The correct choice of gearing is governed by engine size and performance, driver weight, weather and track conditions, and of course the track layout. Fast and relatively flat tracks are different to slower ones with tighter corners, or those that include major changes in elevation. On a track that is unfamiliar to the driver, experimentation prior to race day is the only way to go. In the final analysis, it’s the stopwatch that should decide the best gearing choice.

Emile McGregor - MSA Technical Consultant